My step daughter was coming to visit and has been wanting me to redecorate her room, so I finally caved. She found a ruffled duvet online for a couple hundred dollars that she really wanted. I saw a ruffled blanket on Pintrest that was made out of a sheet and thought I would use that idea to make a duvet instead of spending a few hundred on it. This is a very easy tutorial, but is very time consuming. I promise you it's worth the work!

All you need:
Sewing Machine/Serger (of course)
2 Flat Sheets that fit your bed
1 Flat Sheet of a larger size
I got my sheets at Ikea. They were only $10 each! Pick out any color you want your duvet in. I ended up getting a cream color, because I wanted to dye the sheets with an ombre effect (white isn't the best to dye). If you want to learn how to ombre dye, check out ritdye.com. They have some great tutorials for different dye effects.
First, I spread the larger sheet out and marked lines down every 6 inches from top to bottom. Cut all your strips out. Because I was on a time crunch, I serged each side of the strips with a rolled hem instead of hemming them. Serging each side gave the duvet more of a "chabby chic" look. If you don't have a serger, or would prefer a cleaner and less "chabby chic" look, hem each long side of your strips.
Lay out one of your other sheets and mark from top to bottom where you want each strip to be. I marked 4 inches between where I wanted each strip to make sure there was enough ruffle to cover the stitch of the ruffle underneath it.
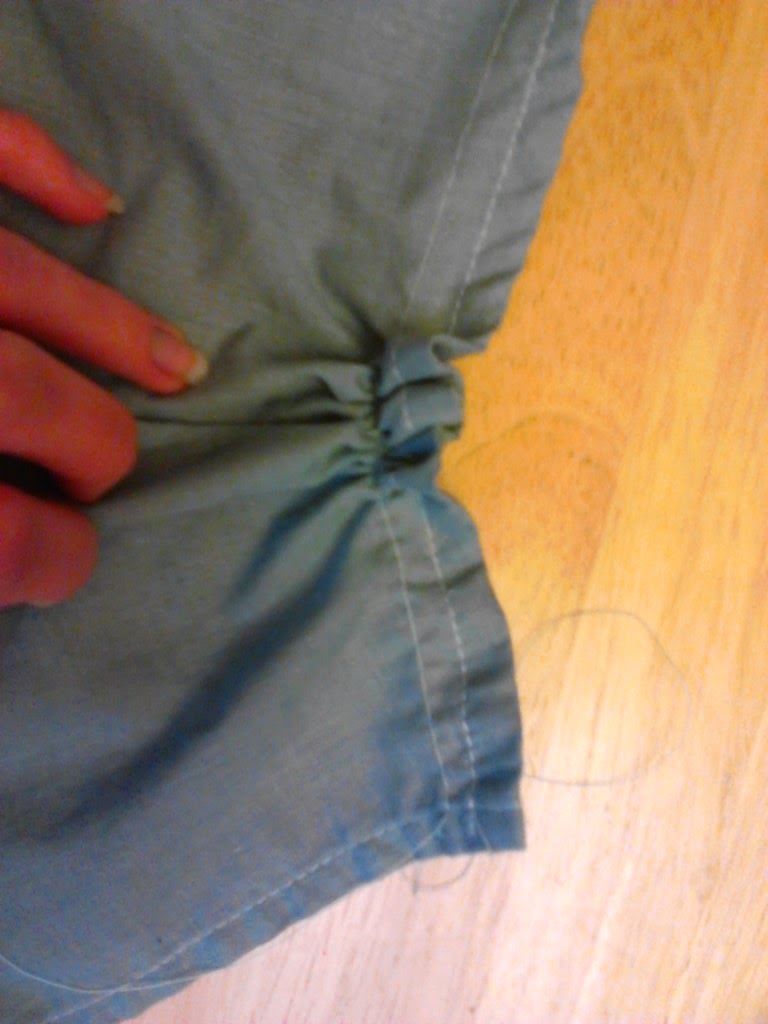
Once you have all of your strips serged or hemmed, you're going to put in a gathering stitch at the top of each strip. To make a gathering stitch, set your sewing machine to the largest stitch length and don't tie off at either end. Leave plenty of thread on each side (start and stop of the stitch) to gather your fabric. When you have your gathering stitch in, grab the tail of the top thread. It can be at either end and pull the thread. You'll see your fabric start to gather. You can push the gather down the length of the fabric. You want to gather enough that your strips will fit across the sheet you've marked. You can push your gather up and down the length of the fabric to spread it out, or push it through to the end to get rid of gathers. Once it's the right length to fit your sheet, spread your gathers out to make sure it looks uniform across your strip.
When stitching your strips to the sheet, start from the bottom and work your way up. Pin and stitch one gathered strip at a time to your sheet until you reach the top.


Now to sew the back of your duvet on! With right sides together, pin in place your ruffled sheet with your last sheet. Paying careful attention that the ends of your ruffles are lined up along the edges of your sheets. Pin and stitch/serge on the top and sides, leaving the bottom open.
For the bottom of your duvet, choose how you would like to close it. You can put a long zipper in, buttons or ties. I chose to use scrap fabric to make ties at the bottom. I cut strips about 6 inches long and attached them every 4 inches along the front and back of the duvet. I figured with the "chabby chic" way the duvet cover was going, it would add a sweet touch.
Now shove your comforter into your duvet and enjoy!
I really enjoyed making this for Tori, she loved the way it turned out! Now I get to make another one for her room at home!
Now shove your comforter into your duvet and enjoy!
I really enjoyed making this for Tori, she loved the way it turned out! Now I get to make another one for her room at home!
ReplyDeleteTry a straightforward style while not lots of tangled edges for your initial screen. Unless you are terribly masterly with cutting paper, print your style out on some notepad and observe cutting it out before making the ultimate cut-out bed sheets
that you're going to use within the silk screen.